Post by Lord FunkyHoof on May 2, 2007 15:19:46 GMT -5
Well this is semi-inspired by Jao's Ongoing Thread in which she is showing the process of her doing a work in progress. Well this isn't really intended as a tutorial, though you can use it as one, but I'm just showing the steps I take whenever I do a sprite edit.
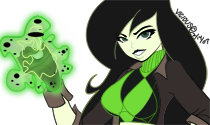
[shadow=red,left,300]Step 1:[/shadow] First of all, if you're gonna do a sprite edit, you gotta have, well, a sprite to edit! So I'm gonna use this one to demonstrate.

Yes for those of you that have played Guilty Gear, that's Bridget. Don't worry, once I start I'll zoom in. Though I'm only focusing on the head and face, I included the neck and partially the chest, that way I'll get a feel of the angle and how it should look. So once I found a suitable sprite, I begin to work.
[shadow=green,left,300]Step 2:[/shadow] Using MSpaint, I Magnify to 8x for a better view. And then, using a distinguishable color, I begin to outline the body and any major features.

[shadow=purple,left,300]Step 3:[/shadow] As I continue I use different colors, because if I just used one color it would really get confusing and hard to interpret what's what as they overlap.

[shadow=Orange,left,300]Step 4:[/shadow] Once I'm done with the visible features, I go ahead and draw out any parts that are hidden in clothing, hair or other accessories.

In this case, his headwear is blocking the outline of his head and part of his shoulder, so I have to guess how it should look like. This is where knowledge of the Human Anatomy really helps, especially if you're dealing with legs and arms!
[shadow=Pink,left,300]Step 5:[/shadow] If there are any corrections to the outline that need to be done, I fix them, and then I begin to erase everything but the outline.

[shadow=Blue,left,300]Step 6:[/shadow] Afterwards, all that's left is the outline, now that all the easy stuff is done, I can now begin to work on it.

From here you can do anything, you can leave it as is, but chances are you're gonna alter it to suit the person you're making.
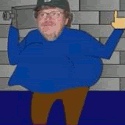
[shadow=Yellow,left,300]Finished Product:[/shadow]

Hey it's Ron! Well, sort of. You can tell I did a lot of rearranging and fixes on it to make it look like this.
Well that's about it, sometimes with the right Know How it can be relatively easy, but even if you know what you're doing, things can get complicated fast.
As simple as it may look, it took me quite a while to develop this whole process, everyone has their own way of doing it, this is just mine. So take care, and I hope you find this entertaining and informative. And if you want to use someone's Original Sprite, get their permission and give credit to them if you do use it.
Now making Sprites from scratch, that's a whole other story!
[shadow=red,left,300]Step 1:[/shadow] First of all, if you're gonna do a sprite edit, you gotta have, well, a sprite to edit! So I'm gonna use this one to demonstrate.
Yes for those of you that have played Guilty Gear, that's Bridget. Don't worry, once I start I'll zoom in. Though I'm only focusing on the head and face, I included the neck and partially the chest, that way I'll get a feel of the angle and how it should look. So once I found a suitable sprite, I begin to work.
[shadow=green,left,300]Step 2:[/shadow] Using MSpaint, I Magnify to 8x for a better view. And then, using a distinguishable color, I begin to outline the body and any major features.
[shadow=purple,left,300]Step 3:[/shadow] As I continue I use different colors, because if I just used one color it would really get confusing and hard to interpret what's what as they overlap.
[shadow=Orange,left,300]Step 4:[/shadow] Once I'm done with the visible features, I go ahead and draw out any parts that are hidden in clothing, hair or other accessories.
In this case, his headwear is blocking the outline of his head and part of his shoulder, so I have to guess how it should look like. This is where knowledge of the Human Anatomy really helps, especially if you're dealing with legs and arms!
[shadow=Pink,left,300]Step 5:[/shadow] If there are any corrections to the outline that need to be done, I fix them, and then I begin to erase everything but the outline.
[shadow=Blue,left,300]Step 6:[/shadow] Afterwards, all that's left is the outline, now that all the easy stuff is done, I can now begin to work on it.
From here you can do anything, you can leave it as is, but chances are you're gonna alter it to suit the person you're making.
[shadow=Yellow,left,300]Finished Product:[/shadow]
Hey it's Ron! Well, sort of. You can tell I did a lot of rearranging and fixes on it to make it look like this.
Well that's about it, sometimes with the right Know How it can be relatively easy, but even if you know what you're doing, things can get complicated fast.
As simple as it may look, it took me quite a while to develop this whole process, everyone has their own way of doing it, this is just mine. So take care, and I hope you find this entertaining and informative. And if you want to use someone's Original Sprite, get their permission and give credit to them if you do use it.
Now making Sprites from scratch, that's a whole other story!